
Инструменты пользователя
Боковая панель
Содержание
Adding your mod to the Custom Game Browser
After knowing the mod better, it's time to incorporate the mod into the Xash3D engine.
Editing gameinfo.txt
There is a file in the Xash folder called gameinfo.txt which is what the engine reads to register the game as a mod (or a game). Open the gameinfo.txt to see the following:
// generated by Xash3D


basedir		"valve"
gamedir		"xash"
title		"Xash"
startmap		"demo_1"
trainmap		"demo_1"
version		0.65
size		41504322
url_info		"http://www.hlfx.ru/forum"
type		"Toolkit"
dllpath		"bin"
gamedll		"bin/server.dll"
icon		"game.ico"
sp_entity		"info_player_start"
mp_entity		"info_player_deathmatch"
hull0		( 0 0 0 ) ( 0 0 0 )
hull1		( -16 -16 -36 ) ( 16 16 36 )
hull2		( -32 -32 -32 ) ( 32 32 32 )
hull3		( -16 -16 -18 ) ( 16 16 18 )
max_edicts	2048
max_tempents	1024
max_beams		128
max_particles	65535
For more on editing gameinfo.txt, see the in the article Exploiting the Game Menu. Note that since the article was originally written for Half-Life SDK, it shows how to edit liblist.gam, but in the case of Xash3D, gameinfo.txt replaces the functions of liblist.gam. In fact, Xash3D automatically generates a gameinfo.txt each time a new mod that uses liblist.gam was played.
With that, here are some of the explanations for the various lines in gameinfo.txt:
- basedir - the main directory name of the game where the engine gets the main assets from. If your intention is to mod for Half-Life, then it should say «valve», otherwise, if you intend to make your own assets and you do not depend on Half-Life anymore, use the same name as your mod.
- gamedir - the mod's directory name
- title - the name of the mod/game. This is displayed in the game menu, the custom game menu, even the title screen.
- startmap and trainmap - the name of the map used during the game's startup and the training course respectively.
- version - the version number of the mod
- url_info - the website of the mod/game. Available only in the custom game menu
- type - type of game for the custom game menu only.
- dllpath - the path of client dll
- gamedll - the name of the server dll (or hl.dll for Half-Life)
- icon - the name of the icon used as the main window icon.
- sp_entity - the entity name used for the main player spawn points (default is info_player_start)
- mp_entity - the entity name used for the multiplayer spawn points (default is info_player_deathmatch)
These are advanced features used by Xash3D:
- hull0 to hull3 - used for collision detection (
 Ask people about the hull's purpose
 - max_edicts - the limit for the entities used by the engine.
- max_tempents - the limit for temporary entities (such as the Egon's beam) used by the engine
- max_beams - maximum amount of beams emitted by the engine
- max_particles - maximum amount of particles for the aurora particle system.
There are also things that we need to place as well. For instance, the function of type is just for the custom game menu only. To really set the game if it's a single player or multiplayer only mod, add this to your gameinfo.txt:
...
gamemode "singleplayer_only"
...
gamemode is a special line to make the launcher lock either the single player components (multiplayer_only) or to lock the multiplayer components (singleplayer_only). This is designed for modders who wanted to have their mod as a single player experience but doesn't want to incorporate multiplayer or modders who make the mod as multiplayer only.
Making a link to the game
There are two ways of making a shortcut to the game. The first way is to make a shortcut to hl.exe and edit it's command line parameters. The second way is to make a batch file. The third and most elegant and most tedious way is to make your own executable, which XashXT has happily provided the source code to Xash.exe for editing.
Method 1 - Making shortcuts
To make a shortcut, you either right click HL.EXE and select 'Create Shortcut' or right dragging (hold right mouse button and drag) to an empty space and click 'Create shortcuts here'.
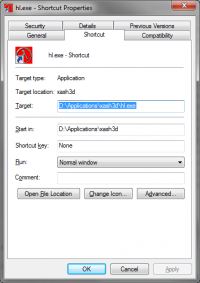
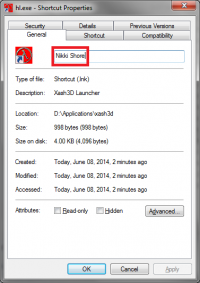
Depending on the OS, you can now see either 'Shortcut to hl.exe' or 'hl.exe - Shortcut'. Right click it and select 'Properties' to bring up the shortcut's Properties panel:
First go to the General tab and rename the shortcut to the name of your mod. Since I'm working on my mod, Nikki Shore, I renamed the shortcut 'Nikki Shore'.
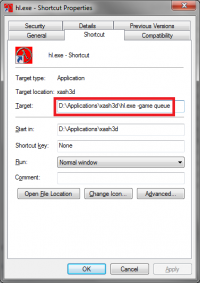
You can go back to the 'Shortcut' tab and begin editing the shortcut. From the 'Target' text box, add the following next to the lines '«directory»/hl.exe':
-game «modname»
where modname is the name of the mod directory, not the name of the mod itself. In our mod example, I placed my Nikki Shore mod on the folder 'queue', therefore I made my target like so:
There are other parameters as well that you can add:
- -dev [1-4] - developer debugging functions and cheats are enabled. Just the parameter -dev defaults to 1.
- -console - enables the 'Console' menu choice in the game menu where you can press ~ to show the console.
You can also add console parameters to the target such as 'thirdperson' or 'sv_gravity 800' by adding '+' along with the parameter, so it becomes '+thirdperson' and '+sv_gravity 800'.
Method 2 - Using batch files
Batch files are another method of executing the exe with the parameters.
Go to Notepad and add the following to the blank untitled window:
@echo off
start hl.exe -game queue
Save it as a bat file (e.g. Run Nikki Shore.bat) making sure that you select 'All files' as the file type. The other parameters can be added the same way as the shortcut as well.
Method 3 - Re-writing Xash.exe in VC++ 6.0
This will be your first foray into programming, by editing what is readily available and change it for your convenience. You can follow along with the tutorial or you can try experimenting on your own.
In this method, we will edit the game launcher exe source code which is located in game_launch. You can use this method as well if your game is sufficient enough to not need the Half-Life assets.
First, open the project by going to File>Open Project in Visual C++ 6 and select the filename 'game.dsp'.
After loading you see that there are three things you can edit from here. The first is editing the C++ source file 'game.cpp'. Go to this part:
#include <windows.h>

#define GAME_PATH	"xash"	// default dir to start from
Edit the GAME_PATH to point to your mod's folder. In our example, it would say something like this:
#include <windows.h>

#define GAME_PATH	"queue"	// default dir to start from
You can now disregard some of the code here or edit some of the strings to personalize it on your own. We can now save the .cpp file and proceed to the game.rc file … ( Use Visual C++ screenshots and examples.)
After editing the game icons and resources, you can now compile your application. ( Doing this tomorrow).
Now you have your brand new application that you can run for your mod. You can now enjoy the sample map and explore more of the default mod.